4 Implementation
4.1 Frontend
4.1.1 Design
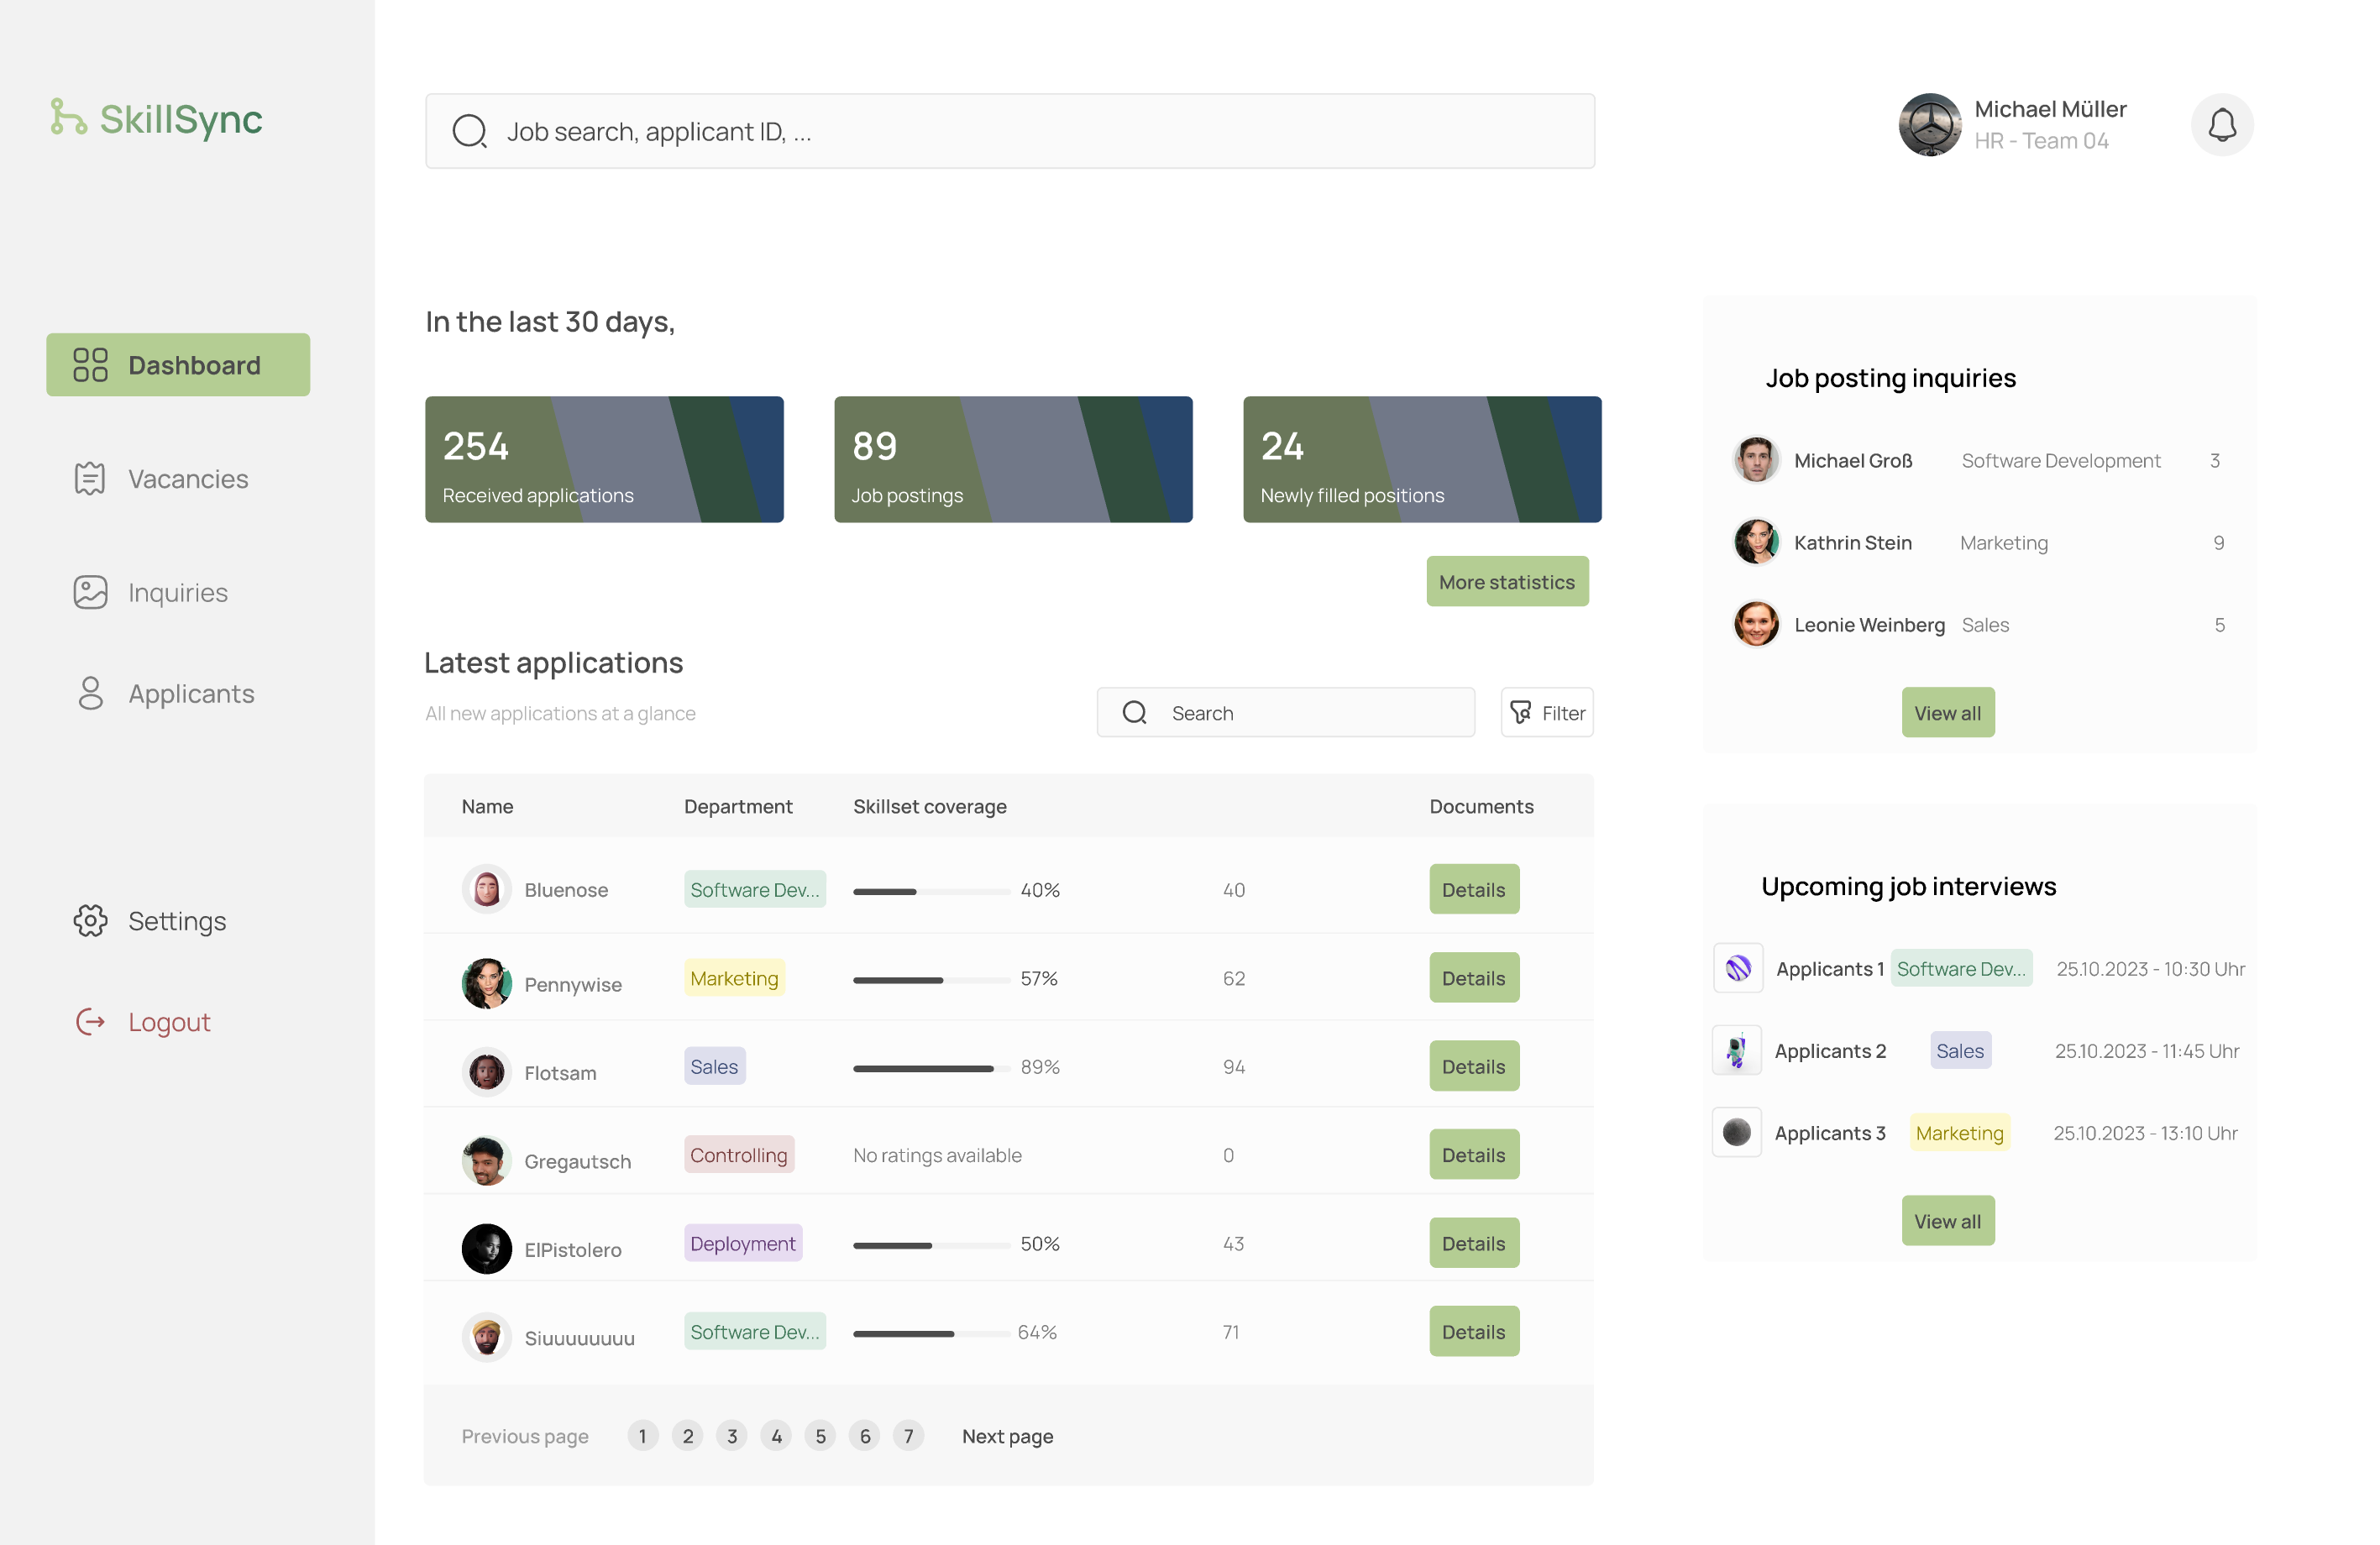
For the frontend design, we first created a mockup with Figma to get a better idea of what we wanted the website to look like. When you open the website, you will see a dashboard, that gives you a great overview over everything an human resources employee needs to know. You can see how many job postings are open, how many applications you have received and how many people you have hired over the last 30 days.
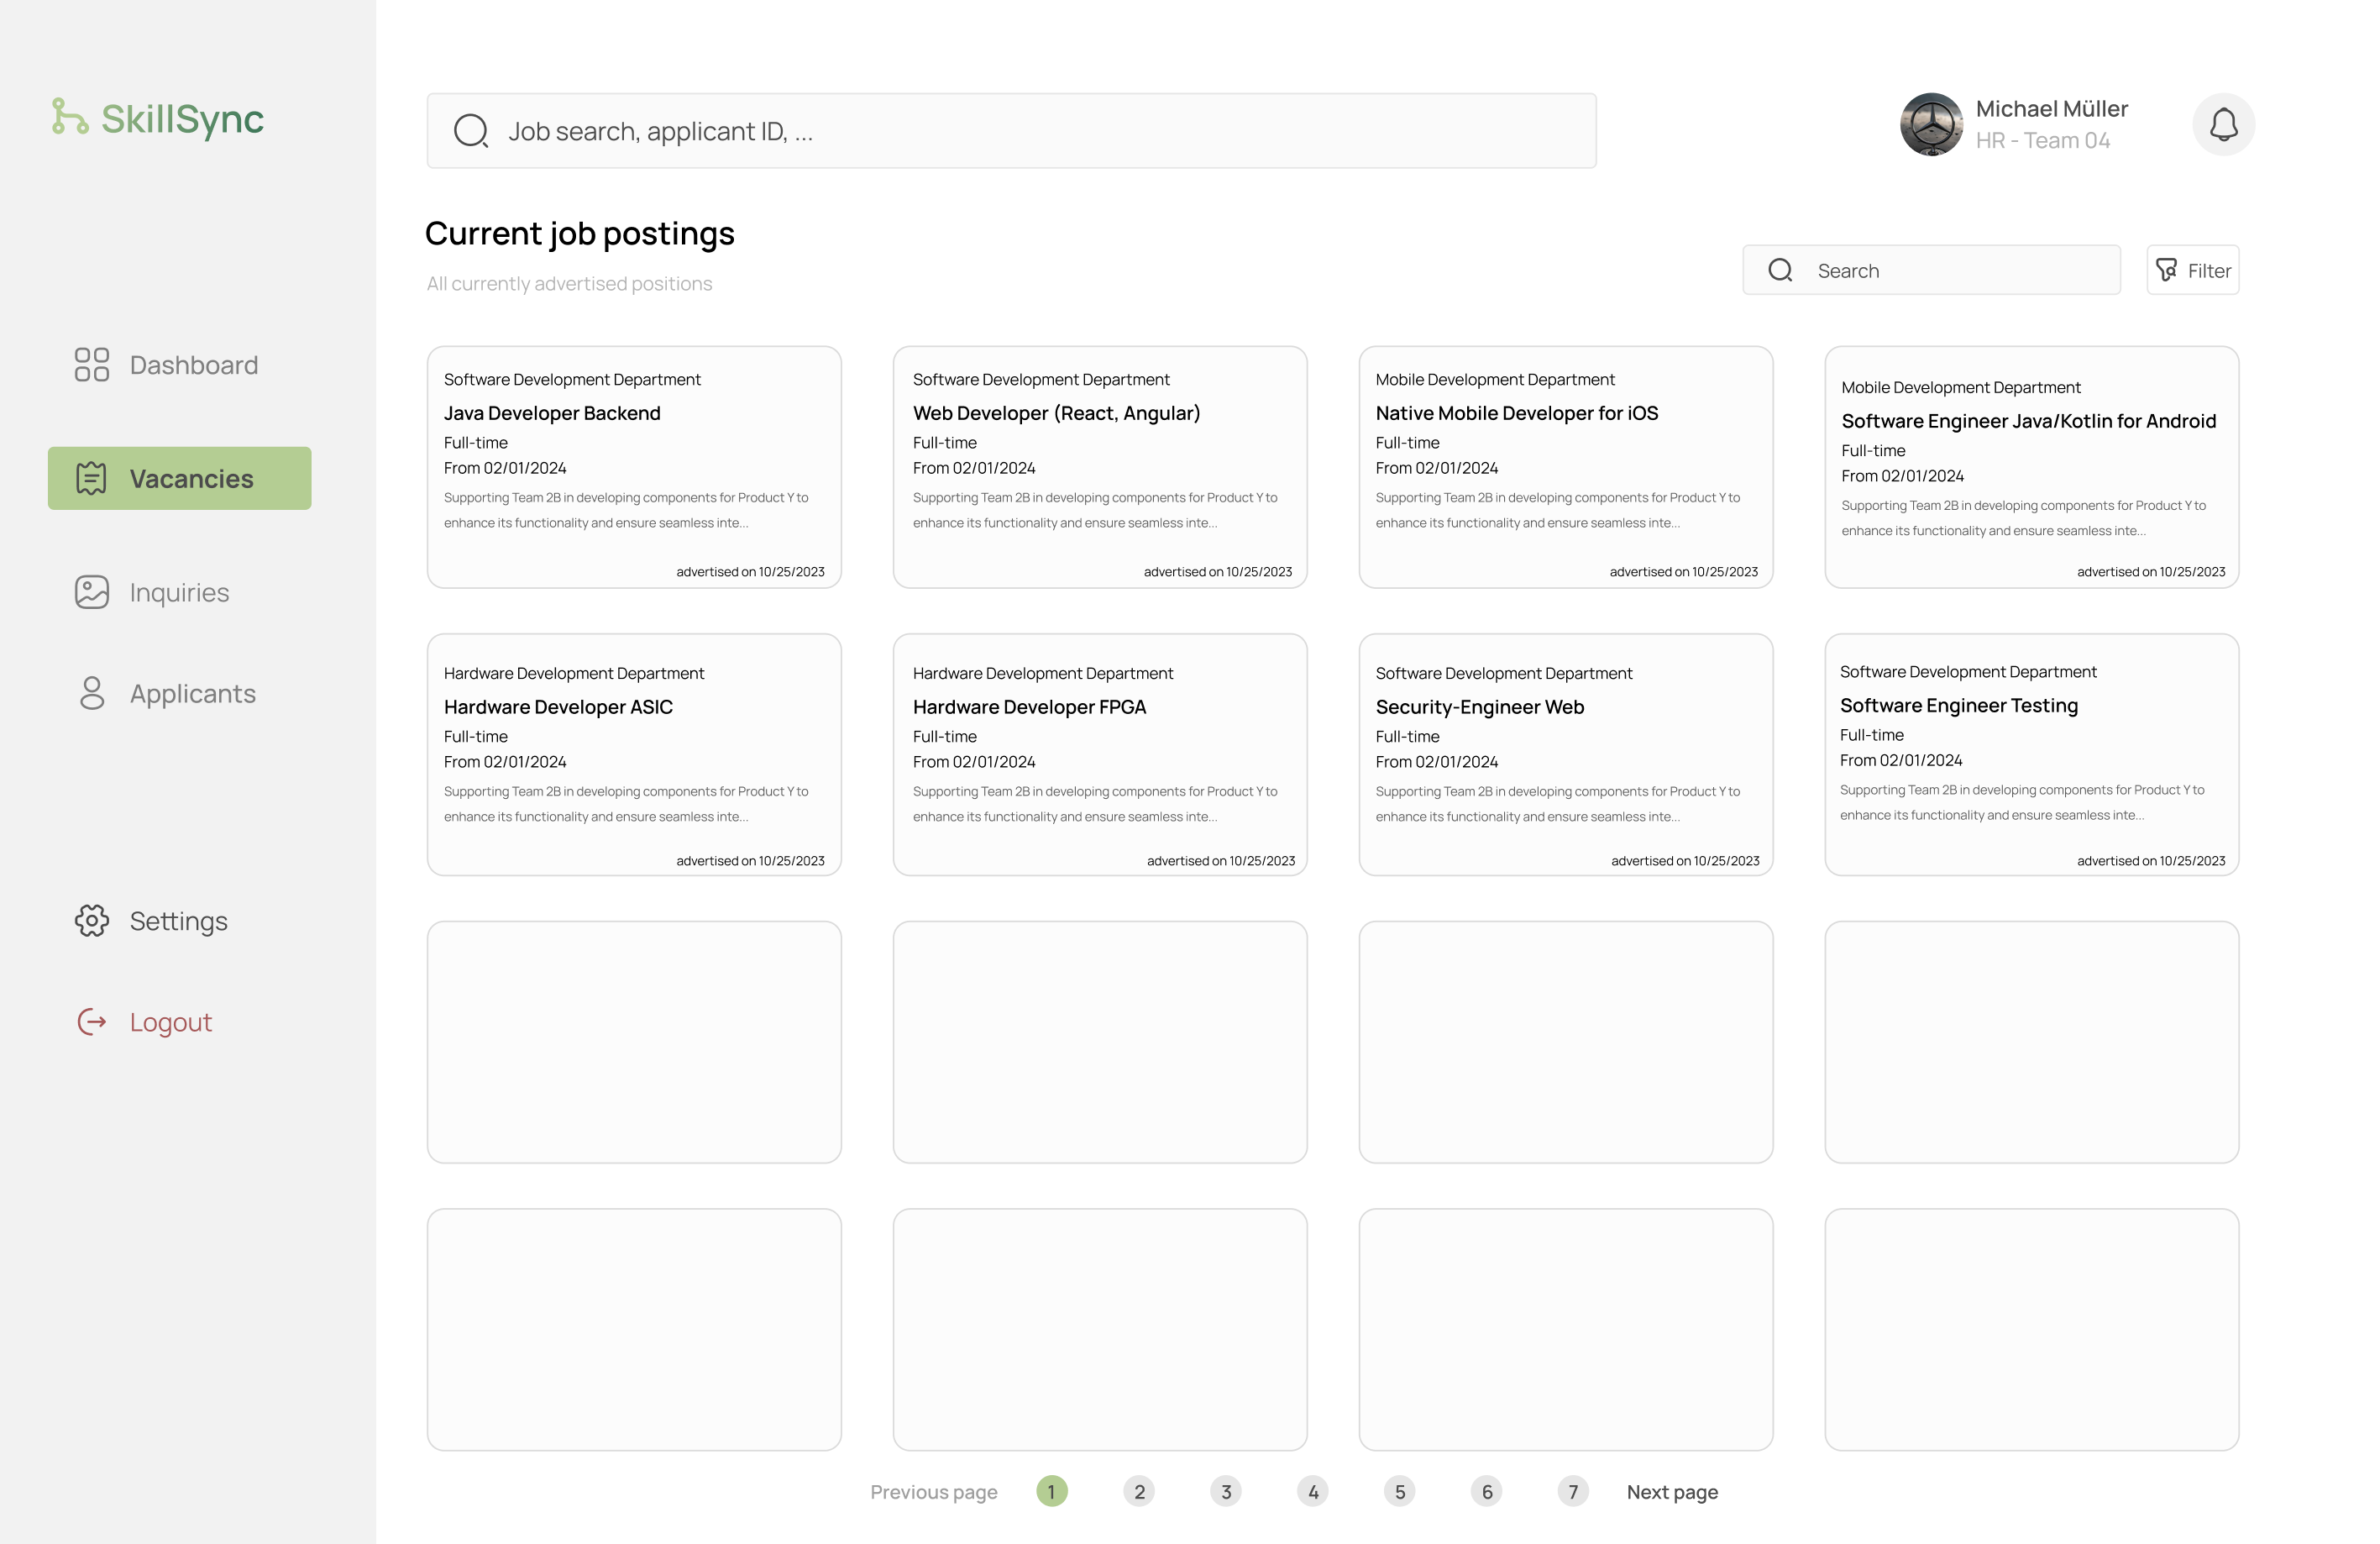
After clicking on the ‘Vacancies’ button on the left side, you will see an overview over all open job postings. You can see the job title, the department and since when this job posting is online. You can also see the first few words of the job description.
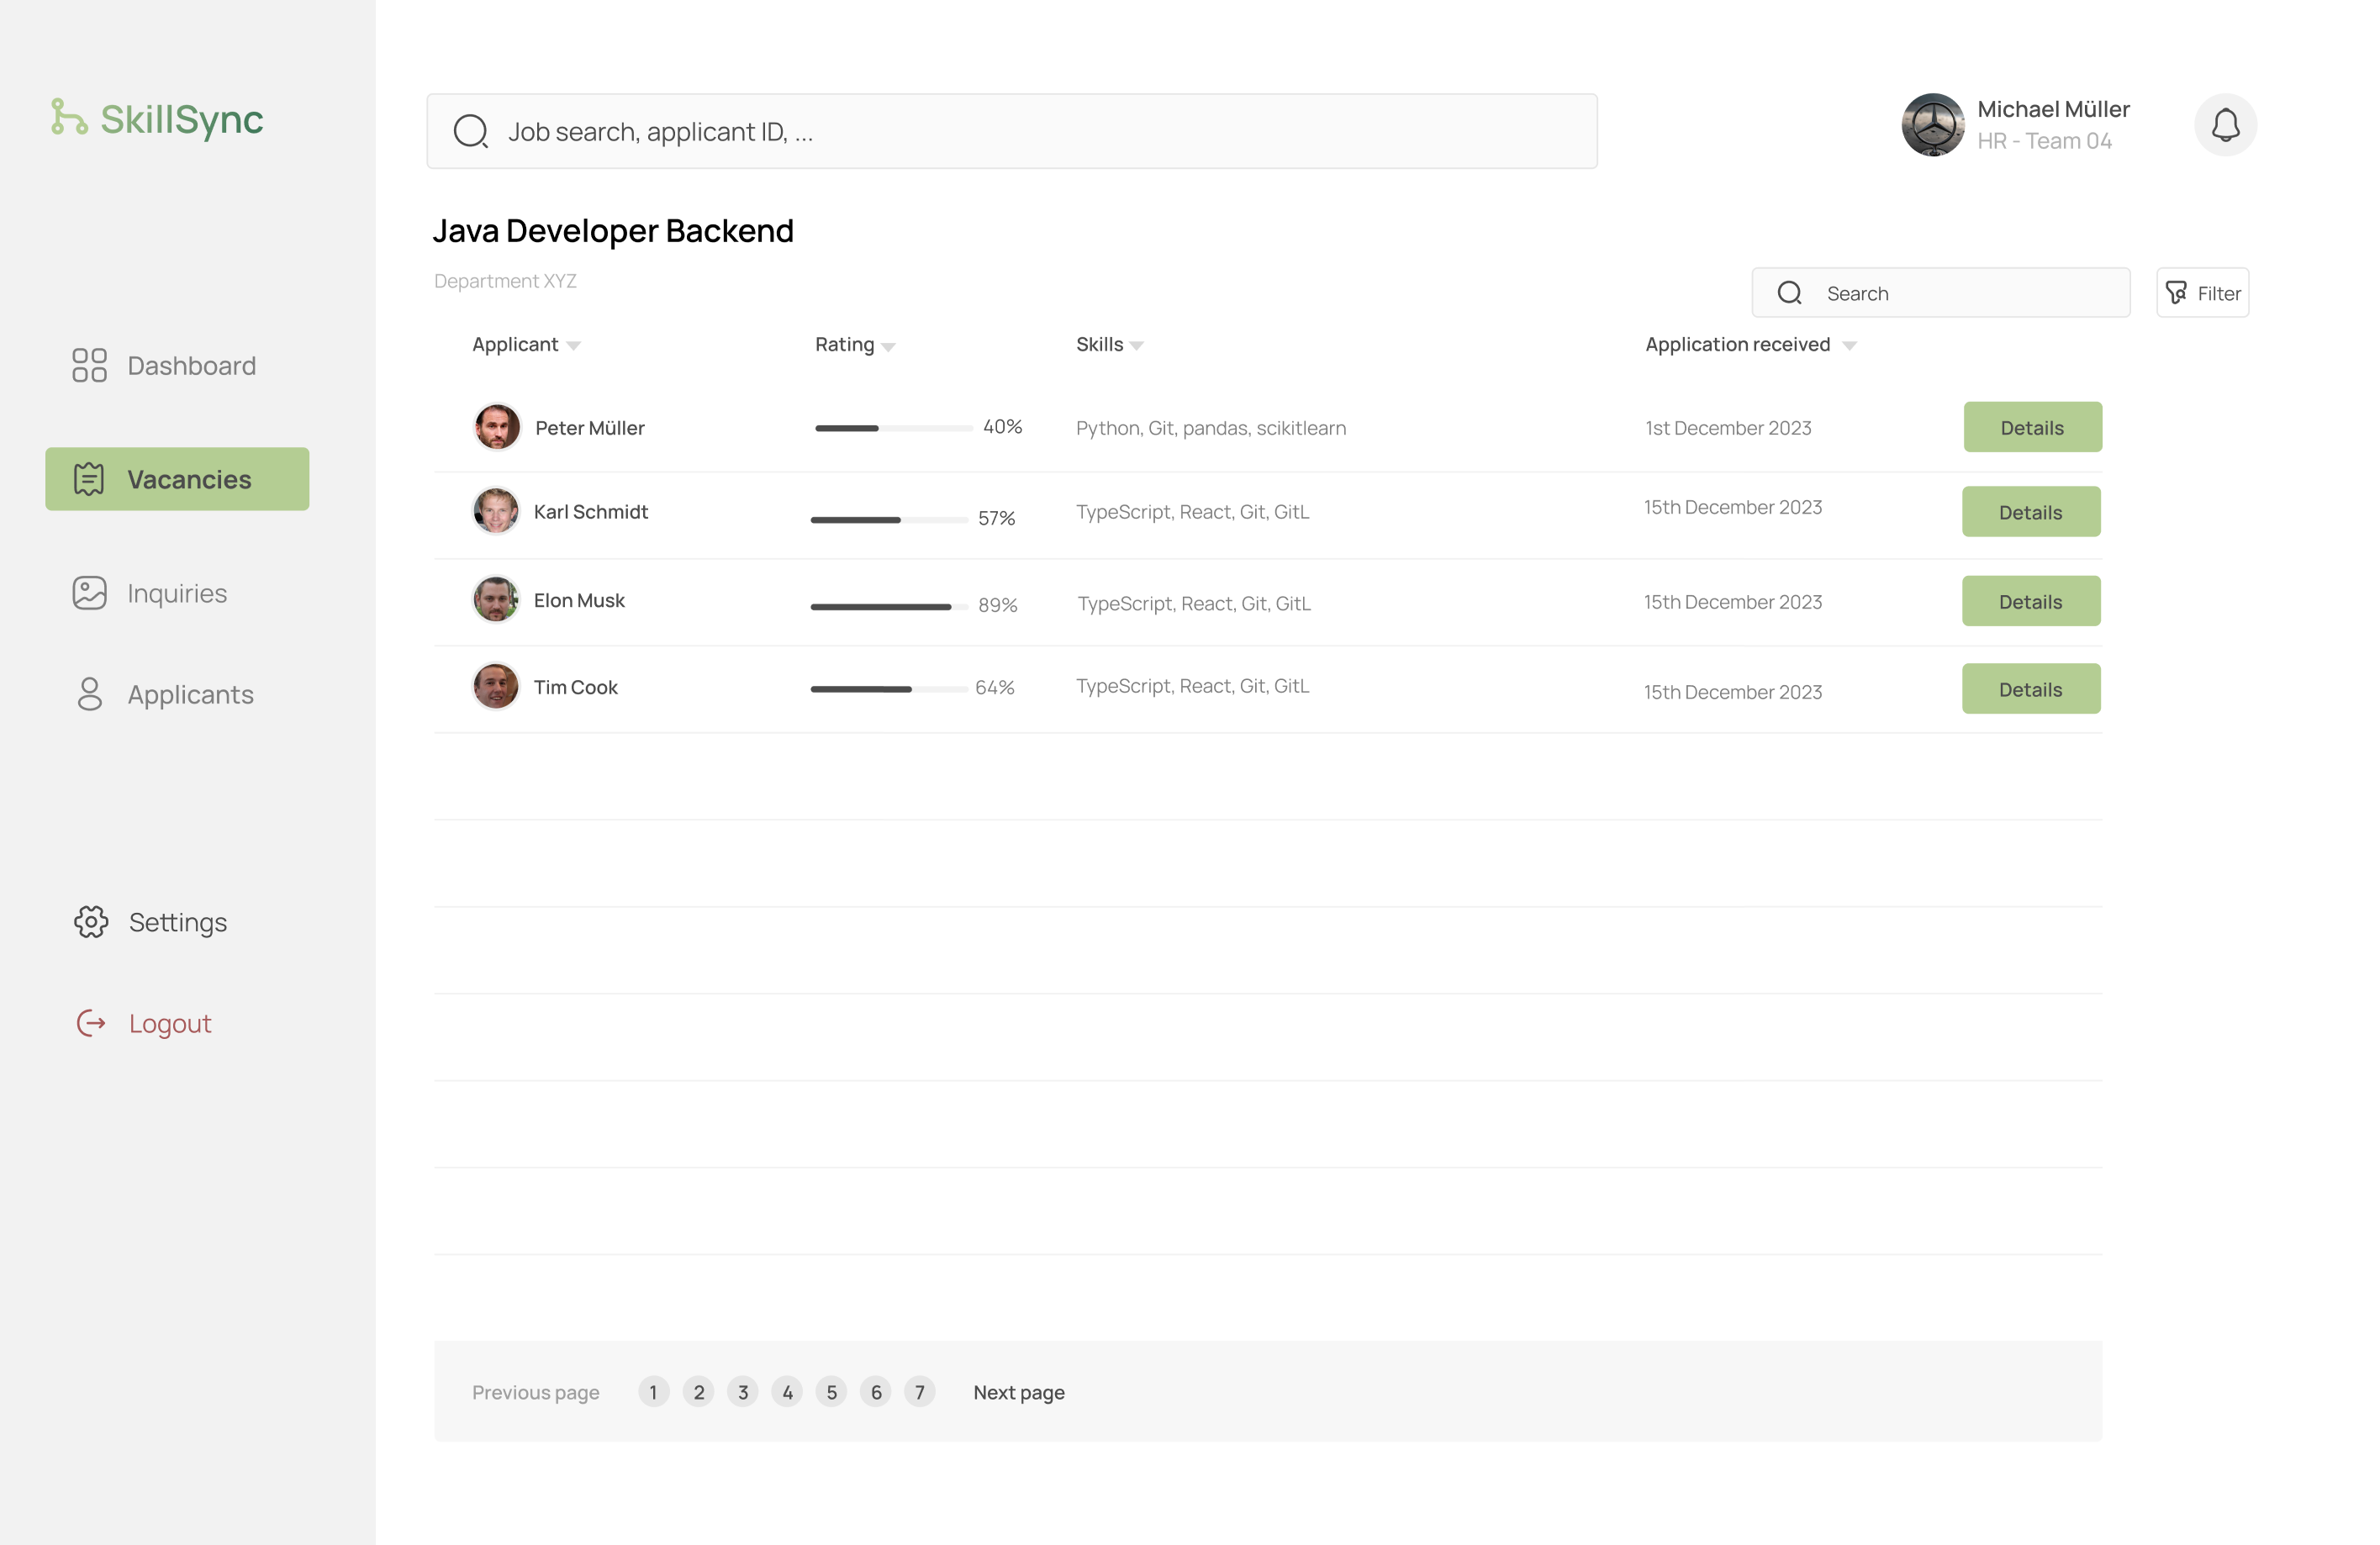
If you then wish to see who has applied to a specific job posting, you can simply click the job posting itself and you will see an overview over all applications. You can see the name of the applicant, the date of when the application was received and their rating based on the required skill set for the position they applied to.
For further information about the applicant and their rating, you can click on the ‘Details’ button and you will see a detailed overview over the applicant. You can see their name, their email address, their phone number, their address and their rating based on the required skill set for the position they applied to with a justification and a original quote from their cv. You also have the option via the buttons on the right side to view and download their cv and cover letter.

4.1.2 Development
For development we used React to create the frontend of the website and as language we decided on using TypeScript instead of JavaScript. We used React because it is a very popular frontend framework and also because it is great for creating reusable components. For creating components, we used the Material UI library to get a nice and uniform look through the easy customization of each component provided by Material UI. For navigation, we used the React Router library to create the routes for the different pages.
Regarding project management for both, frontend and backend, we used GitHub Projects to create a Kanban board to keep track of our tasks and to assign them to different team members. We also used Pull Request to review each others code and to make sure that the code is up to our standards. In our opinion, reviewing each others code is a great way to learn from each other, to learn reading and understanding foreign code and to improve our own coding skills. And as a nice side effect of using GitHub Projects, we were able to keep track of our progress and to make sure, that we are on track with our project.
For Routing through the different pages, we used the React Router library to create the routes. We created a API module so that we have a standardize and easy way to fetch data from our backend REST-API. In regards to TypeScript types we defined all types object orientated like we designed them in the backend and used them throughout the project to make sure that we have a consistent type system.
When it comes to creating components, we divided our mockup into smaller parts and created a component for each part. We always tried to create reusable components to make sure that we have a consistent look throughout the website. To ensure that the components don’t become too big, we also created smaller helper components to make sure that the components are easy to understand and to maintain. We also created a theme for the website to make sure that we have a consistent look throughout the website.
4.2 Backend
4.2.1 Backend Design
For designing the backend, we used the Entity Relationship Diagram (ERD) to get a better idea of what we wanted the database to look like and we also used class diagrams to model a raw structure of the backend. In addition to the ERD we figured out, which type of database we should use for what kind of data.
4.2.1.1 Class Diagram
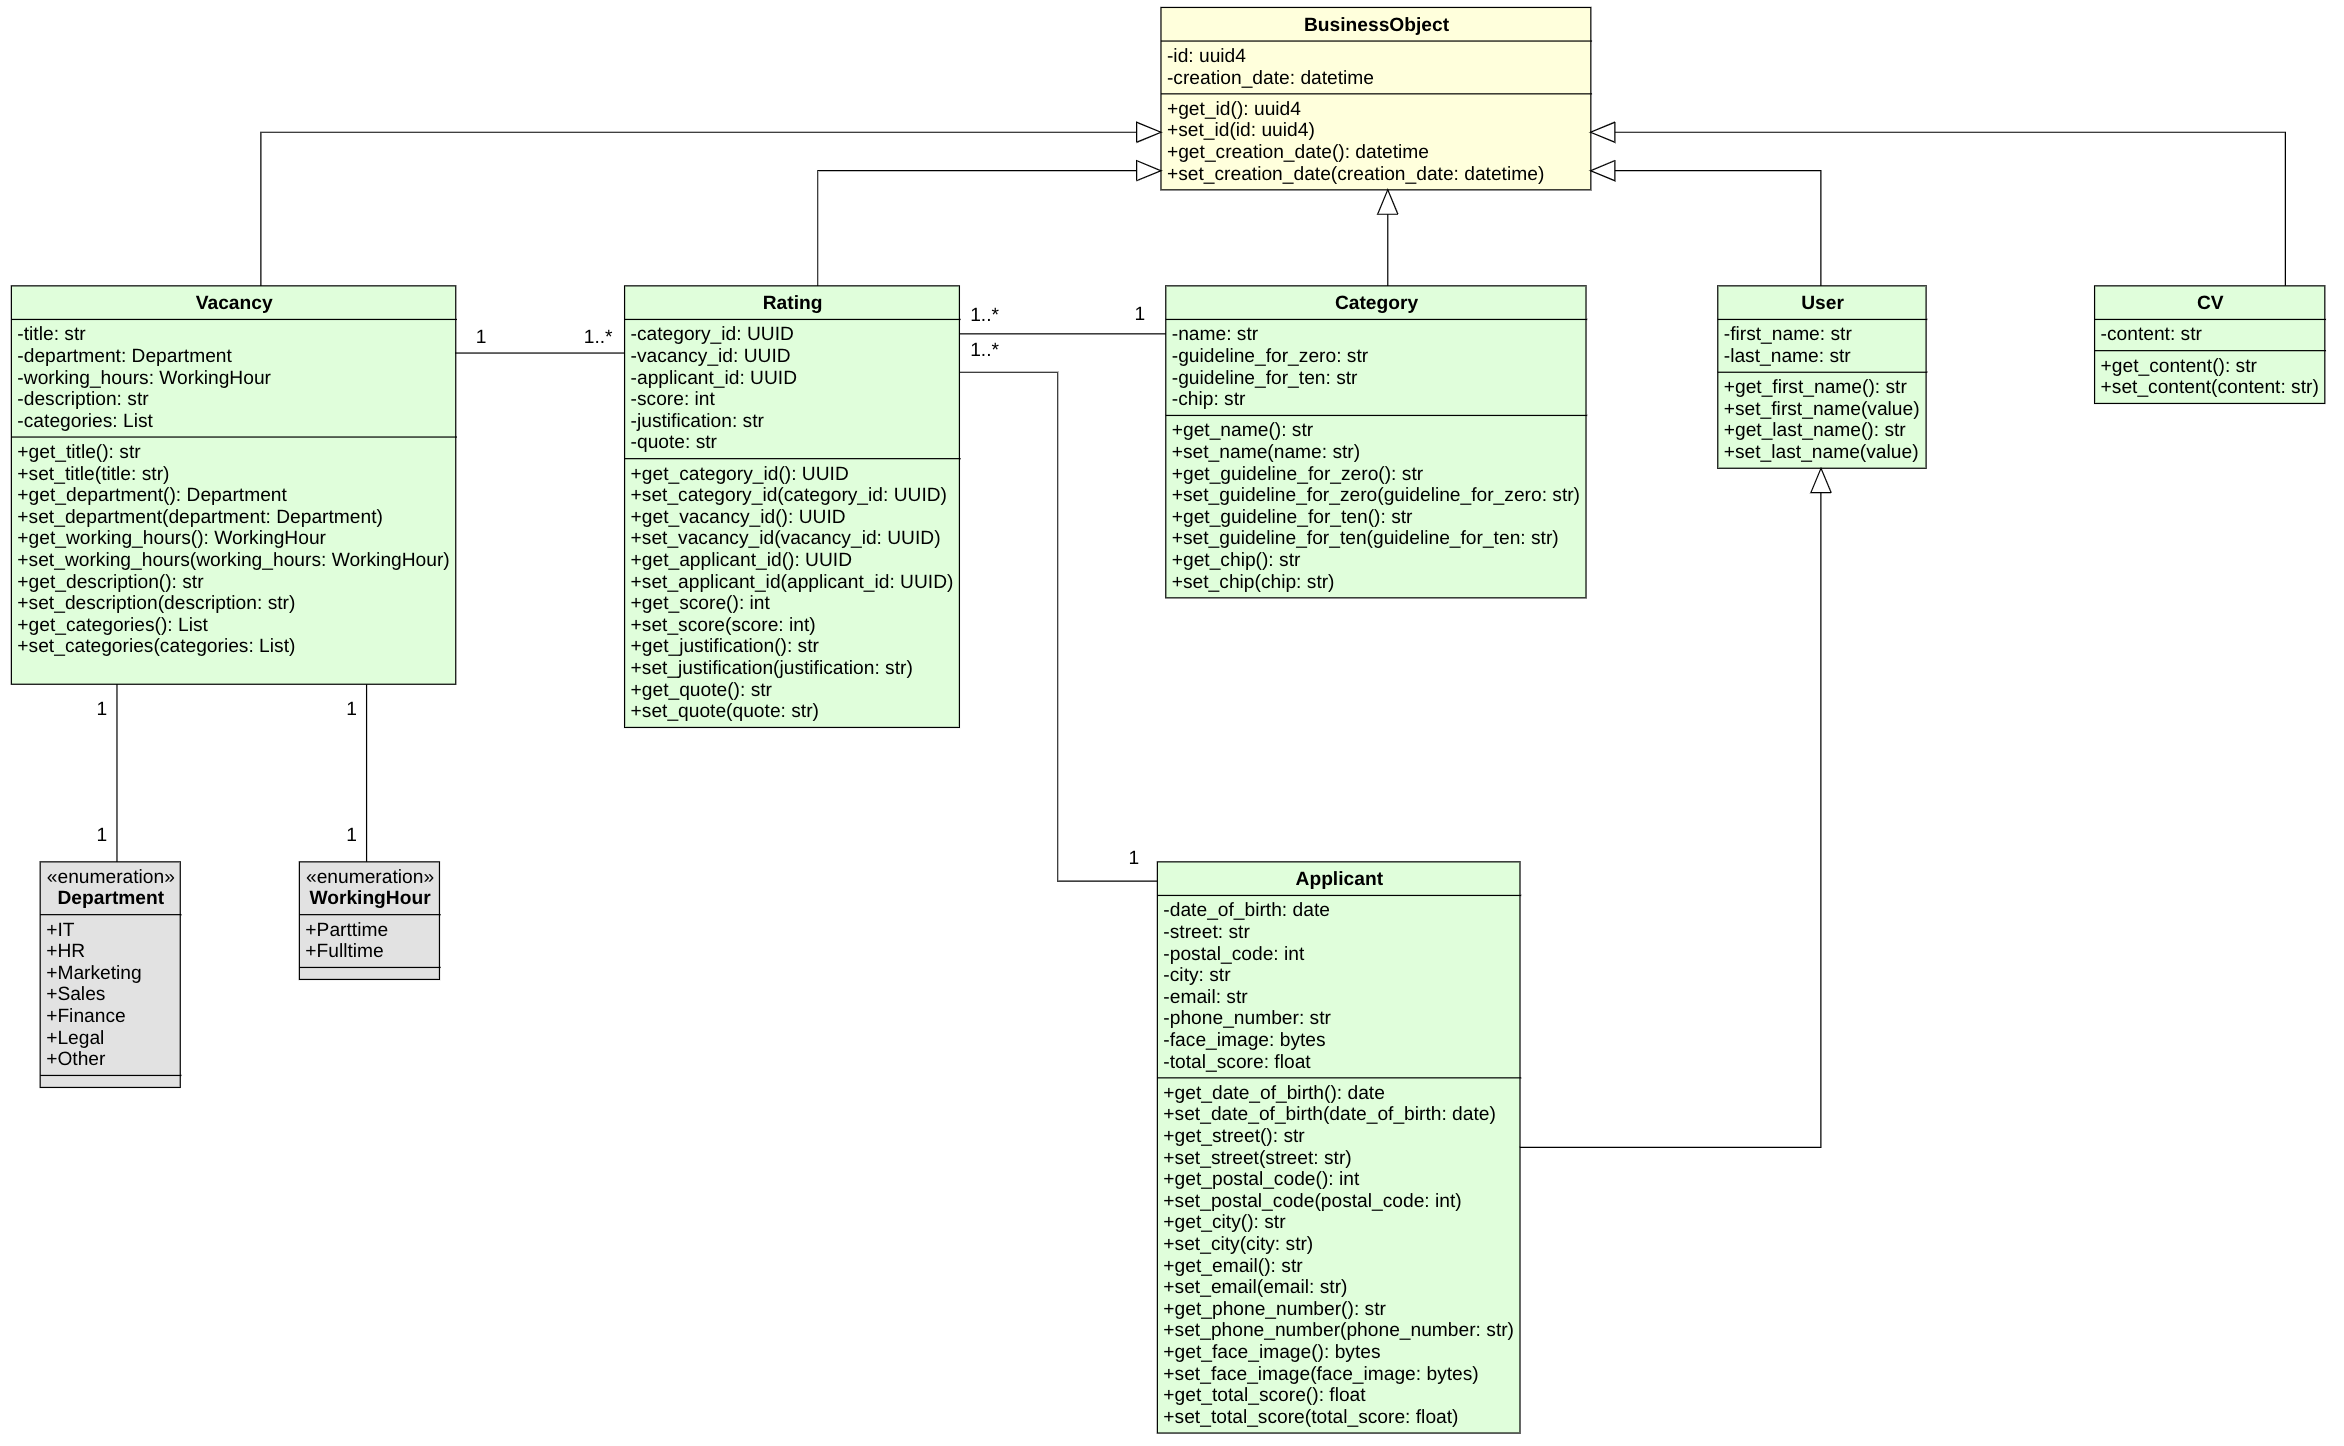
As the class diagram shows all classes interhit the business object, so every instance of every class gets a id and a creation date. The class User could be missleading, since the applicant is not a user in the system per se, but still inherits the fistname and the lastname from the user. The Idea was to also create a Employee class, which would inherit from the user, but we did not have the time to implement it. Both the properties department and the wokring_hours are realized with a enum, so that the user can only choose from a predefined set of values. The explanation on how we implemented all the classes can be found in the section Backend Development.
4.2.1.2 Entity Relationship Diagram
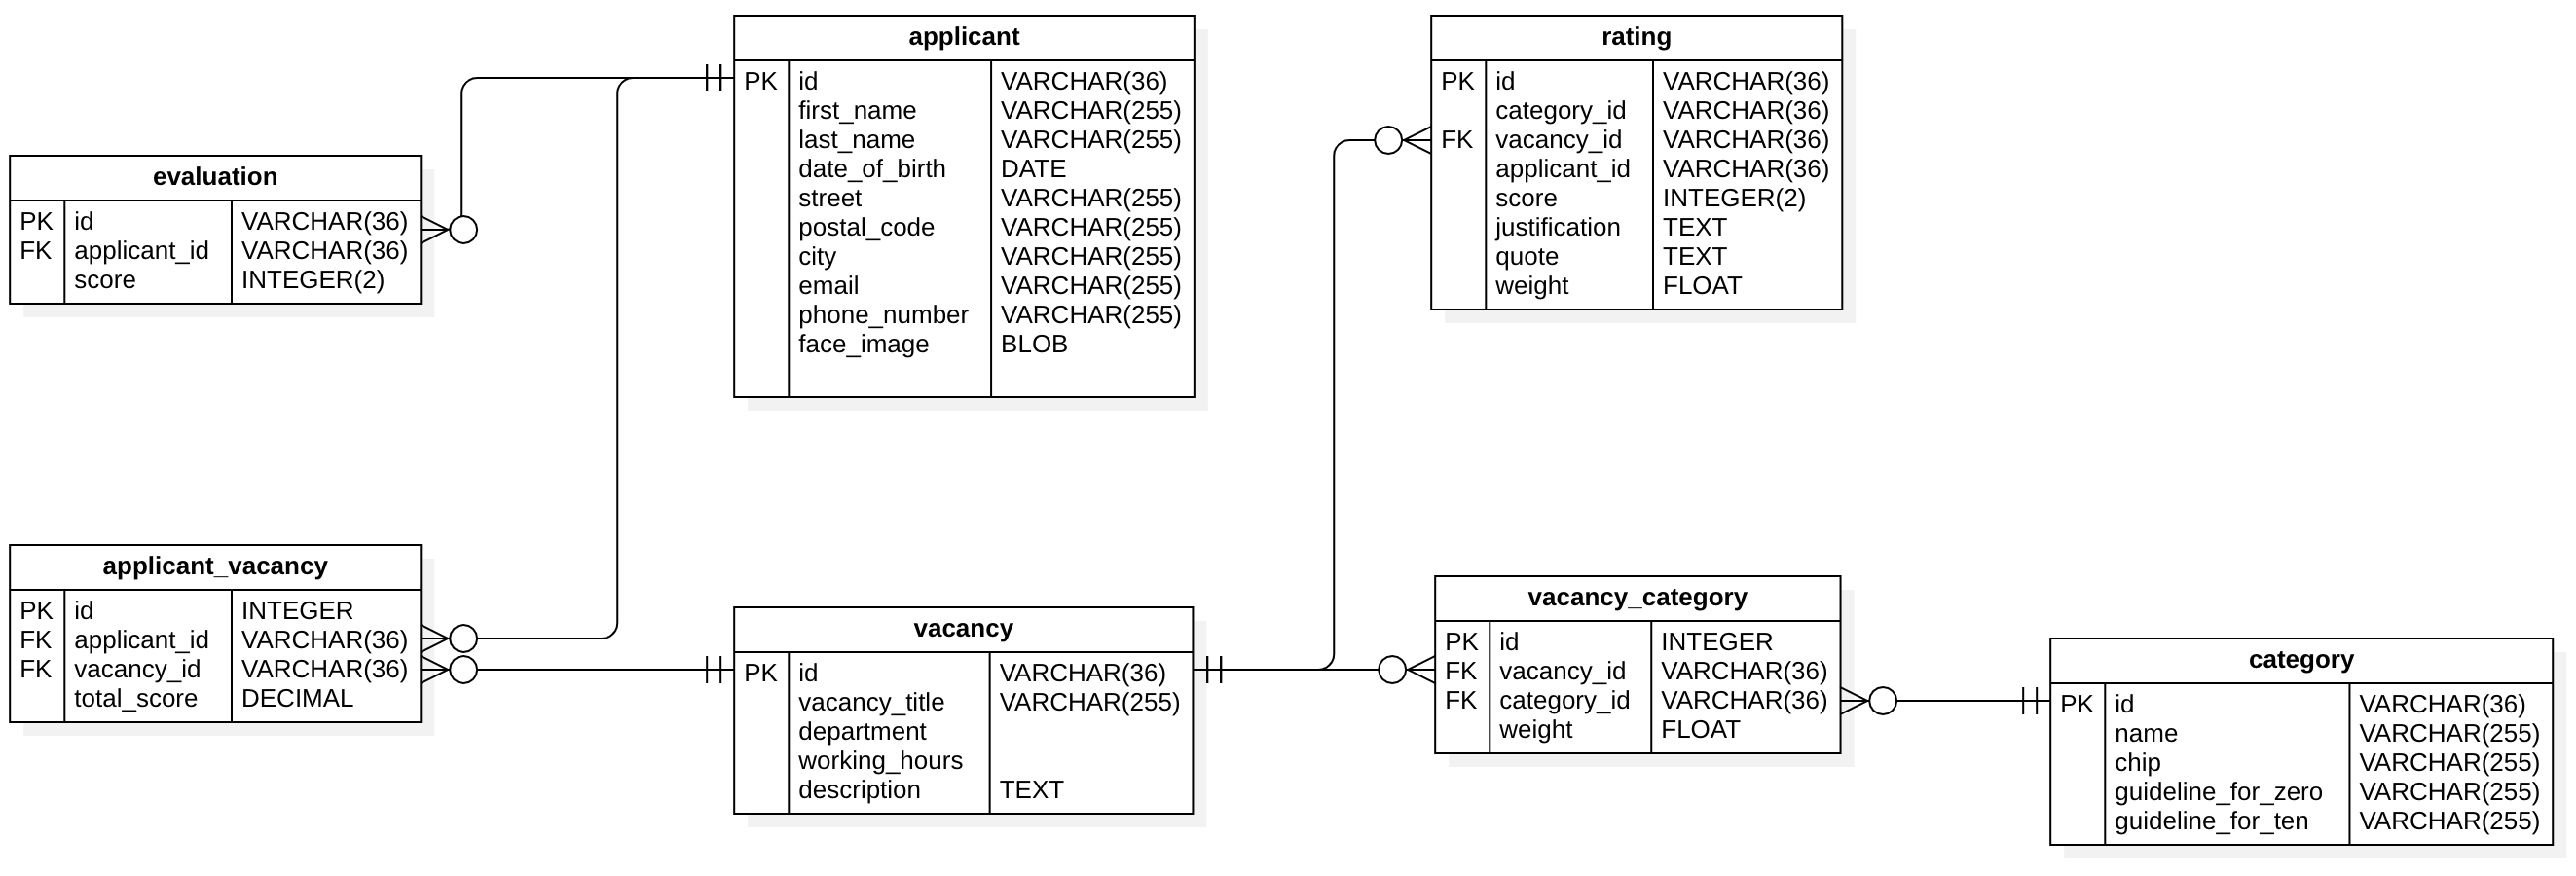
The Entity Relationship Diagram shows all the tables of our relational database. We added a additional table for the evaluation, just to keep track of how good the rating of the applicant was. Other than that we are not using the data of the evaluation table in the application itself. More information on how we implemented the relational database can be found in the section Backend Development.
As mentioned earlier we are using both a relational database and a document database. The reason for that is, that we are also dealing with documents besides the objects, which are shown in the class diagram. Each vacancy pdf, which is uploaded by a user is getting stored inside the document database. This has the advantage, that both storing and retrieval is more efficient with a document database than with a relational database, since we are dealing with larger files. How we implemented the document database is explained in the section Backend Development .
4.2.2 Backend Development
4.2.2.1 Databases
For the relational database we used MySQL and for the document database we used MongoDB. We are using Docker to run both of these Databases inside Docker containers, which are build with the help of a docker-compose file. The reason for that is, that if there are any changes to the database, we can simply delete the container and rebuild it with the new changes. In addition to that we have initial sql scripts, which are executed when the container is build. This is done to make sure, that the database is always in the same state, no matter on which machine it is running. Another important point is, that both databases can be started, stopped, built and destroyed with a single command. This is very convenient, since we do not have to start and stop each databse manually. Both containers are based on the latest images of the databases, so that we always have the latest version of the database. The docker-compose file can be found here.
For working with the realtional database we where using either DBeaver or a extension for Visual Studio Code by Weijan Chen. For working with the document database we used MongoDB Compass, or also another Visual studio Code extension, by MongoDB itself, to get a better overview over the documents and to make sure that the documents are stored correctly.
Storing data inside the mongodb is different than storing data inside a relational database. In a relational database you have tables, which are connected to each other with foreign keys. In a document database you have collections, which are similar to tables, but you do not have foreign keys. In our case we were using GridFS from MongoDB. The reason for that is, in case somebody uploads a large file, which means bigger than 16MB, we can still handle it. The way GridFS works is, that it splits the file into smaller chunks and stores them in a fs.chunks collection. The metadata of the file is stored in the fs.files collection.
4.2.2.2 Backend Application
Since we need a API connection to both GPT-4 and to our frontend, we decided to use Python and Flask. We build an API with different endpoints for our frontend. These different endpoints can be found here. Because of the limited time, we just implemented the CRUD operations we needed. All other operations are specified inside the abstract mapper classes for both databases, so they can be implemented fairly easy. The mapper classes can be found here.
Each class shown in the class diagramm above implements both getter and setter methods to set and get properties for each instance. The properties are defined as private, so that they can only be accessed by the getter and setter methods. The reason for that is, that we can make sure, that the properties are only set to valid values. All of the classes can be found here. The following list shows the operations where we use the GPT-4 API:
- The extraction of personal data from the CV in function
get_personal_data_from_cvinside cv_service.py - The creation of categories and their chips (rather tags, but by accident we went with the term for the corresponding UI element instead) in function
assign_chipinside category_service.py - The creation of the vacancy text in function
generate_textinside vacancy_service.py - The evaluation inside rating_service.py, which will be explained more in detail in the evaluation section.
As mentioned in the beginning of this section we have also implemented a connection to the OpenAI GPT-4 API. Those API calls are stored in different services throughtout the project. The services can be found here.
The services in general are not only used for API interactions with OpenAI but also for other operations, with different classes. For this reason each class has its own service, which is responsible for the operations of the class.
We used multiple different python packages to implement the backend. You can find all packages here inside the requirements file.
All functions inside the the backend repository are documented with the help of the autoDocstring extension for Visual Studio Code. This is done to maintain a consistent documentation throughout the project and to make sure that the code is easy to understand for other developers.